Thursday, December 29, 2011

Dad's star

I received a really special gift from my dad 15 years ago that he made.   It's a wooden star that lights up.  It used to be part of my family's outdoor Christmas decorations.  We displayed it proudly.  I remember one December using our extention ladder to climb our Hickory tree in the front yard.  I wanted to hang it as high as possible for everyone in the neighborhood to enjoy.  And then, like all things with miniature Christmas lights, it broke.  The star has been stowed away in our garage in a box for probably the last 8 or so years. 

My dad passed away in 2006.  He was 89 1/2 years old.  A really good man.  And a really awesome dad.  So, my remake project today is a little bittersweet.  I thought of my dad all day as I worked on it.  He was a handyman.  I think all Wisconsin dairy farmers have to be.  He used all his gifts: electrician, builder, engineer, entrepreneur.  He could fix something that was broken better than new. 

So, today, I fixed something broken.  I remade my dad's star into something new.  As I looked at it closely, I could see that someone (me?  my dad?) had already mended it - putting electrical tape around several of the mini lights so they would fit snuggly into the holes.  There was tape on the back of the star, probably more reinforcement.  It was time to give this sentimental keepsake new life.  So this is what I came up with.


I'm very happy with it!  But, let's start from the beginning.  This is the star front and back when I started remaking it today.


I pulled all the old lights off and primed it twice.  I thought it would look good in blue.  So I mixed a little blue paint in with some more primer and painted it using a bunched up plastic bag.  You know what I'm talking about.  It's the same faux treatment we use on our walls.  It's great at hiding fingerprints and the daily wear-n-tear a house endures.  I like the look.  It was perfect for the star.  Can you see the difference?

So then I was thinking about adding a saying or some words to make it interesting to look at during the day.  I thought about a big "starry, starry night" kinda scribbled on it.  I thought of something more in line with Christmas..."O holy night, the stars are brightly shining..."   Then, I thought I might want to use it throughout the year, so maybe something more universal.  I searched through my bible and found Psalm 147:4: "He counts the number of the stars, He calls them all by their names."   FOUND IT!  There was an instant connection for me.   What a beautiful verse that speaks of God's relationship with the universe, both the sheer grandness of it all and the lovely intimacy of knowing each star, naming each star.  Yes, this was it! 

The next step is to make a stencil.  I used my Cricut.  (It worked really slick.)  I painted the words on with black paint and a small brush.    


And now for the lights.  As much as I don't like these miniature Christmas lights, I gotta say, they make for a good show.   I thought of restringing the lights the way my dad intended, but it's really difficult to keep the lights in place so the pattern in front looks uniform.   So I purchased some jute and literally sewed the lights on.  Going in and out of the holes and holding the lights in a line at the edges.   This took awhile to do.  Thank goodness, I made a good estimate on how much jute to use so I didn't have to start over.      


Well, when I finished it, I smiled...way down deep.  I felt really connected to my dad.  Like maybe he would've thought of doing this too - decorating the star this way.  I thanked him for being handy.  I figure I got some of these 'handy' genes.   My bittersweet project turned out pretty spectacular.  My dad's star isn't broken anymore.   In fact, I think I fixed it better than new...well almost. 


I'm gonna hang it up outside near my front door.  I hope everyone who stops by will read it and enjoy it's lights.  Perhaps it will put a smile on their face. 

Here's to all the bittersweet moments we have in our lives.   Thanks, dad, for hanging out with me today!  Miss you.     

Thursday, December 22, 2011

Handmade Christmas Ornament

Visiting my daughter, Emily, usually provides some set-aside time for making something fun.  She's a crafter like me.  Our list of fun things to make is a mile long.   Emily was inspired by this cute little yardstick ornament on Pinterest and knew she (we) could make it (or something like it). 

our inspiration from Pinterest
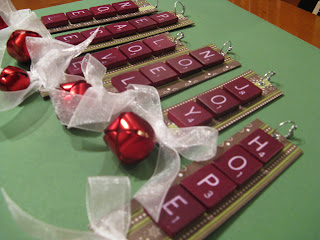
our remake version

We gathered all the supplies we had on hand and spread everything out on the dining room table.  Scrapbook paper, cardboard, snowflakes, scrabble letters, ribbon, jingle bells, wire, rivets, etc. 


I had a set of letters I found at a garage sale this summer.  I wanted extra letters so I could play speed scrabble.  Well, these letters were a really pretty deep red and didn't match my other scrabble letters, so I gave them to Emily for this project.  How providential!  (Just so you know, I found three scrabble games at thrift stores in the last couple of weeks, all of them missing some letters.  But not to worry, I combined them all and now have enough for a really long game of speed scrabble. 
So, when you get the itch, please stop by.) 
 

The words that could be used for this ornament are endless, well, as endless as your scrabble letters allow.  One could make something really personal by using a name or initials or a favorite word.  We spelled out several Christmas words to use on our ornaments.  


Once this was done, all we had to do was plug in the hot glue gun and form an assembly line to construct them.  I glued the scrapbook paper onto the front and back of the cardboard for the background.  Then, hot-glued the letters onto the paper.  We added a little rivet at the top and bottom to add embellishments.  Emily made all the little wire loops that will hold the ribbon or hooks to hang them.  She's really good with wire.  It adds a nice homey touch to the ornament. 

  
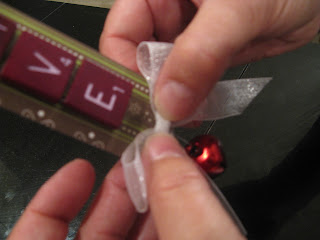
We finished them off with a pretty white ribbon bow and a jingle bell at the bottom.  This completes the look and adds a little festive jingle to the ornament to be enjoyed by those folks who have the need to touch ornaments hanging on a Christmas tree.   (Yes, I'm one of those.  If I come to your house during the holidays, know that I'll spend a few minutes enjoying your ornaments up close and personal.  Hope you don't mind.) 


Here's the assortment of ornamements we made in an afternoon.  Of course, there is one hanging on Emily's Christmas tree standing tall in her living/dining room area.  The rest are Christmas gifts for friends and family.  Just a little something to add to their lovelies already adorning their tree.  


I hope you're inspired to make something new this year for your Christmas tree or someone else's.  What an adorable little stocking stuffer for someone special in your life! 

May your Christmas to be filled with Peace, Love, Joy, Hope! 
Noel!

Tuesday, December 20, 2011

In This House

Sometimes I can come up with an original idea and run with it.  Sometimes, I see someone else's idea and run with it.  My sister, Sandy, and I both liked this wooden sign we saw on Pinterest and had to make it.


When a Saturday finally opened up when we were both available, we went digging around in my garage for scrap wood and we found these two pieces.  Both had potential. 
The second piece of wood was the winner.  It would need some reinforcement.  So we hunted around in her scrap wood pile and found a 1x4 piece of wood.  We nailed it to the back and then cut the whole piece to the right size.  This all took about 2 hours!  Two hours!!  And we hadn't really done anything yet.  

So, onto the paint.  We concocted an acceptable color of paint by mixing what we had on hand: a sample size of Renwick Golden Oak and ceiling white.  It seemed to work alright.   I watered down the paint so the wood grain would show through.  We liked that rustic look.   We didn't sand the wood or prime it. 
Once the prep work was done, we were ready for the lettering...the really exciting part!  We had to make some design decisions now.  How big would the letters be?  (3 inches)   How many sentences would fit on the board?  (9)  What color of paint for the letters?  (black)  We wrote out what we wanted on a piece of paper and then went to work.  The steciling took a lot longer than we anticipated.   I was thinking a couple of hours or so.  We had scheduled a movie with the fam at 9pm.  No problem!  HA!  At 10:45pm, we were painting on the final letter. 


We filled in the stenciled letters to make them solid.  The stenciling is what I call putsy work.  You can't rush it, and you can't take short cuts.  We worked on more than one sentence at a time so we didn't smear the paint.  For some reason, I've always enjoyed putsy work.  For this project, the putsy work is the last thing to do.  Once all the lettering is done, the sign is done!!!  
What a great way to finish!

So, here's our finished product!  I think it looks fantastic!!  I'm so glad we did it!  Now, all Sandy has to do is hang it up in her kitchen.  
What a beautiful way to remind each other how we choose to live. 


Friday, December 9, 2011

Knitted earbands


They are all the rage these days! I see them everywhere on everyone! I'm not a hat person, never have been. I'm envious of all of you who can put on a hat and look fabulous! Do you know how lucky you are? Well, I thought these little beauties might be the solution to my dilema.


So, one day I sat down and decided to find the pattern and see if I can knit one for myself.  I found a great tutorial on YouTube that walked me through the entire process.  If you're a knitter yourself and want to try your hand at making one of these, check out iKNITS.  Once I found these easy-to-follow instructions, I made my first one and felt so proud!  I haven't knitted anything in years, and I actually find crocheting more my style (it's much more forgiving if when I make a mistake.)  So, I was thrilled that I could knit this earband. 


And I'm telling you, when I figured it out, I couldn't put down my knitting needles for weeks, and I mean WEEKS.  Every Packers football game, I was knitting; every Glee episode, I was knitting; every time I had a free moment, I was knitting!  I can almost make one now without looking at the pattern.


I added knitting needles to my thrift list.  After all, I only had one pair of needles, what up-and-coming knitter can have only one pair of needles?  On a recent visit, I found one knitting needle - one!  I looked store wide for it's match, to no avail.  Now, you might be wondering why I don't just buy some brand new knitting needles!  It did cross my mind, and I was tempted on several occasions.  BUT, what fun is that, I ask?  So, that one very spectacular awesomely good day when I walked into the Goodwill store and found not one, but FIVE pairs of knitting needles - all different sizes, my eyes went big, and my heart skipped a beat - it felt like Christmas!  You can imagine my joy.  Yea, that German stubbornness paid off. 


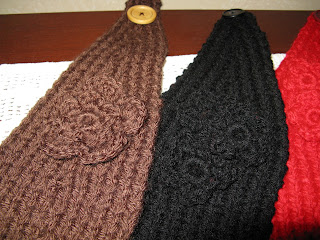
I have eight earbands finished.  I love all the colors.  They are different sizes, cuz not everyone has my size head.  I have two friends who saw them and want one.  That's a good sign! 

I'm on the hunt for buttons, now, too.  Big beautiful buttons.  I passed up a big box of buttons at a garage sale recently.   Now, I'm kicking myself.  Someday, I hope to understand that urge to buy some random item that makes no sense at the moment.  Ah, live and learn.   

There's a bonus to these earbands for me; the flower embellishments are crocheted!!  I love to crochet.  It's fast, easy to learn and like I said before, forgiving.  I hope you can see these sweet little flowers!  I have a pattern for a big one and a small one, so I can mix and match.      

So, there you have it.  Now, on those wicked cold days of winter, I can wear something on my head that looks decent (if not fabulous) and keeps my ears warm.  And that is a very good thing.  

Tuesday, December 6, 2011

Making it Christmasy

Like many of you, decorating our homes for Christmas is a family tradition.  We unbox years worth of trinkets, bulbs, wreaths, candles, ornaments.  Over the years I found collecting irresistable.  I have collected santas, snowmen, reindeer, angels, and nativities.  I can't resist treasure hunting for more.   (Do you KNOW how many garage sales have Christmas items?  ALL of them!  I have developed some discipline over the years, but ocassionally something does come home with me.  It's all good.)

Do you ever say to yourself, "this year I'm going to keep it simple"?   I do, now that my girls are living on their own and we travel over the Christmas holiday.   (I haven't decorated a Christmas tree in three years.)  I do love the look of Christmas, though!  The lights, the candles, the smell of pine, the special ornaments, all are wonderfully delightful and help create that special feeling as we celebrate the birth of Jesus.     

On Sunday night, I hosted a Christmas party for more than 30 Young Life friends.  It's an annual celebration and it's been at my house for the past few years.   My sister, Sandy, helps me decorate my home for this party.  She's awesome and I need her honest opinion and crafty eye.  What I don't have, she brings with her.  And usually it's the perfect touch.  So, here's my simple Christmas decorating for this year!

This is my IKEA wall.  I call it that because the shelves and black iron candle holders were purchased there on separate trips.  I just discovered this week that the candle holders fit perfectly in the shelves!  What a prize!

Add a few sprigs of holly berry in glass vases and it's complete.  Instead of real candles, I used the flickering-light battery operated ones.  They give a nice warm glow and create no mess.  Now, that's simple!


The name collage was a gift a couple of years ago. I love it! It's personal, simple and has a great look. Check out Endearing Gifts if you'd like to give one as a gift or order one for yourself.


This is the table in the entry.  The red tin I just picked up last week at Goodwill.  The pinecones have been used every year for 30.  They are from the farm my husband grew up on.  A nice family heirloom.  The star sticks I bought at a moving sale  - homemade and charming.  The tree I also found at Goodwill, when my daughter, Emily, was shopping for snowmen to start her collection.  (I offered her mine, but she wanted to collect her own.  Oh dear, do you see a pattern here?)  The candle is homemade, too.  I used a clear glass container.  (I bought a box of these at a garage sale this summer for $2.  They cleaned up great!  You'll see more throughout the house.)  I wrapped it in twine and then spray painted it in white, removed the twine and voila!  Check out Pinterest for all kinds of ideas!  Easy and simple and pretty!
 
This is one of 10 nativities I have.   Many of them were purchased at Sinsinawa Mound near Dubuque IA.  I try to retreat there once a year, usually in January.  They always have a spectacular display of nativities from around the world.  I fall in love with one (or more) every year.  This little sweetie came home with me last year.


This is a simple and pretty setting.  I made the  three kings counted cross-stitch years ago and it comes out every year.  The pointsetta and some cut boughs make it cozy and fragrant!  


I have about 10 inches of space above my hickory cabinets in the kitchen.  I thrifted all these different wooden trays and woven baskets over the past couple of months.  This is where I used more of the clear glass containers.  Filled them with dark blue and purple ornaments.  And I have a string of white lights up there too, to give it a really beautiful glow.  The B E L I E V E blocks where a Christmas gift last year.  Perfect colors and they fit great above the bay window.  So pretty!


This is my Advent wreath this year.  Garland with white lights swagged below them.  Purple and pink ribbon wrapping the candle holders.  (Yep, do you recognize these?)  I used a little glass candle holder inside the big one for the votive.   It's resting on a handful of ...rice? no.  cottonballs?  no.  mini marshmellows?  yes!  I decided these would be just right!  


This is my bay window in the kitchen.  I always love decorating this space.  Every year it has a nativity.  This year it is home to the most traditional nativity I own.  And the biggest.  When my girls were little, I would have the three kings 'en route' to Bethlehem.  We'd find them on the bookshelf across the room 'traveling' as Christmas drew near.  Baby Jesus was placed in the manger on Christmas Eve.  This year, it's all together from the start.


I brought out one collection in full this year: snowmen.  Mostly because I can keep them up after Christmas.  And because they're so adorable!   I don't decorate every room in my house, only a few.  These little happy-faced snowmen make their home in the powder room.  They make me smile!The counted cross-stitch is one of my favorites projects.
 
There you have it.  I like that I have some old favorites to be nastalgic about and some new finds that can surprise me.  I hope you have fun decorating your homes for Christmas! 

It can be simple!  And it will be beautiful!  I wish PEACE to all who enter!