Tuesday, October 23, 2012

Vintage wine shelf

Oh Yeah!  We had a fabulous day driving to LaCrosse WI last Saturday!  Emily is home for a week and UW-LaCrosse is her alma mater.  I have three neices attending there now, so on family weekend we decided to drive up with my sister, Sandy and her husband, Blaine, (mom and dad to two of my nieces.)  Highway 14 is loaded with antique and resale shops and wouldn't you know it...we hit about ten garage sales too, plus a flea market.  OH MY!  A beautiful Wisconsin indian summer day of sunshine and 60 degrees.  Can't beat it. 

They drove their truck and I drove Dory, my Subaru.  We planned to fill them both.  We came close. 

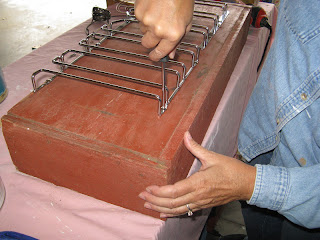
Emily came home with the great idea to make a wine shelf from an old drawer that holds bottles of wine and wine glasses.  We found this awesome old red drawer at one of our stops for $15 and fell in love immediately! Take a good look at her vintage beauty.


We added  two under-the-cabinet wine glass holders (one I found at a garage sale for $1, one we bought for $10 at Bed Bath and Beyond.)  They don't quite match, but they do the job nicely.  We attached them both underneath the drawer.  Together they hold 12 wine glasses.  Nice.


Now for the top side where the wine bottles will be stored.  We had to notch out the front of the drawer so the bottles fit.  We measured the inside of the box (30 inches), did the math (!) to fit six bottles of wine, drew lines and started cutting. 


I sawed about an inch down on two sides and then used a drill to go across the bottom of the notch.  I know there is probably an easier way to do this, but I have limited tools, so I used what I had.  It worked like a charm, too. 


Then we used a rasp to smooth the notches, followed by sandpaper.  This is good teamwork!


This shows the underneath wine glass holder. 


We need to get brackets now, so it can be attached to the wall.  Emily will have to provide the finished picture when she gets home and puts it up.  But so we can enjoy it now, we are holding the drawer with empty wine bottles (that I'm saving for something...?) and four wine glasses in the holder.  Pretty neat.  


This is as far as we can go with it.  I love the idea.  I love the look.  It was easy and fun to make.  It will be fun to use.  Can't wait to see it up...we visit Emily at Thanksgiving.  Some Wisconsin cheese curds and James J. chocolates and we're set for a nice visit.    Yummy.


Sunday, October 14, 2012

Typing table

Here's a cute little remake that was really fun to do.  I found this wooden typing table at a resale place on our last all-day-Saturday-bargain-hunt.  She was in really good shape, just not very pretty.  She was cheap too.  So a good deal all around. 

 
This is the table taken apart and put on my work table getting primed.
 
 
Her legs all ready for some new paint.
 
 
Here she is all painted up and put together.  We lived together for a few days and then I decided on something different... 
 

...I changed my mind from white legs to black legs.  This change happened because I wanted to stencil this checkerboard pattern on the table and I wanted to use black paint.  Looks great with the pretty green. 

 
The stenciling took awhile, but it was worth the time and effort.

 
A little distressing with a hand sander and she's all finished and ready for some cute little cozy corner. 


Wednesday, October 3, 2012

Shadow boxes

I found these cute little wooden boxes at Saver's the other day. I looked at them for about 5 minutes before I decided to buy them. Call me stupid. It will never take me that long again to bring home wooden boxes of any size.   They were a blond wood without design.  Two different sizes.  Two of each size. 


I primed them all, inside and out and left them to dry in the sun.  My sister came over and was looking at them and saw the two square frames I had taken apart and was painting.  She fitted one of the frames over the top of one of the boxes and - VOILA - it all came together.  Sometimes its that easy.

So, I glued the frames to the boxes and it was pretty much over.  I taped printed paper to the inside of each box and loved them instantly.  They are about 1 1/2 inched deep, enough for a little vase, or a letter of the alphabet or some other little knack.   Put in pink paper for your little girls room with her initial on it or a black and white photo of you and your honey with a couple of well-preserved dried roses.    


 I will have some fun finding a place for them in my home.  


A License plate remake

I have recently fallen in love with license plates.  We have a stash of 8 or so.  As I look through them, I kinda remember which car they belonged to.  We've had some nice wheels!   

I have also grown really fond of drawers...the wooden or metal kind.  I've been using the drawers from dressers that are beyond repair or from those obsolete tv cabinets.  The drawers are still useful even though the pieces of furniture they were attached to are not. 

So here's my most recent project, putting two of my faves together.

 
The drawer was brown to start with as many drawers are, so I primed it and then I painted it red and then I distressed it a little bit with a hand sander. 
 
 The license plate belonged on Sarah's car, Marvin.  Do you name your vehicles?  We do.  Marvin was purchased from a relative; he was a black two-door 1998 Chevy something...(Cavalier maybe?)   He was in our family about 5 years.  He spent a winter in Fraser, Colorado with Emily, my oldest daughter.  He was buried under a foot of snow for months as his two-wheel drive just wasn't enough power for the Colorado snowfalls.  So when Emily decided to stay in Fraser for awhile she purchased a new car (a sporty 5-door, 4-wheel drive Subaru named Sally).  And Marvin came home to Wisconsin. 
 
 
He was in an accident this spring - one of those slushy/icy/slippery/snowy/rainy/sleety kind of storms. Sarah was driving back to Edgewood College from Mt. Horeb and hit a patch of black ice and rickashayed off the cement divider, carened off the road and landed in the creek some 20 yards from the road. Marvin was totalled. But he did his job - he protected his precious cargo - Sarah was unharmed. We took a few minutes the next day to give him our regards as we cleaned him out and handed over the keys.


Today, Marvin lives on through his license plate. 
 
 
(Think how cute this would be with a personalized plate!!)
 
So, what is he good for now?  A years worth of your favorite magazine will fill him up.  Or put him in the bathroom with a couple of regular-sized rolls of toilet paper, or some rolled up towels - that would be cute.  He could be your mailbox, if it's on your porch under the protection of a roof.   
Lots of different uses.  He's gonna end up in my craft room toting some IKEA catalogs.  
 
A cute little remake for sure.  Thanks, Marvin.