Wednesday, November 30, 2011

Jackson's Barn Advent Calendar

I have just finished a project that I adore.  I've been working on this project for three weeks mentally and one week physically.  It's an Advent Calendar.  In the shape of a barn.  Yes, it's for a special little boy who is in love with tractors, cornfields, combines, wagons, (did I say tractors?), barns, animals, plows, hay.  You get the idea.  Jackson lives in the city, but he's a farm kid at heart.   I wanted to make him an Advent calendar for his Christmas present.  I'm his Godmother...such a special privilege and honor for me.  I've been scouring the internet for ideas for calendars that I could make.  There are a gazillion good ideas out there (that's why it's taken me three weeks to settle on one.)

Here's my finished Barn Advent Calendar!
   

It all starts with a big boot box.  I remember making diaramas with my girls for school projects some years ago.  And so the Friday night after Thanksgiving I finally got started.  With a craft knife I cut the bottom of the box open to make two doors.  I used thin cardboard to make the roof.  I used alot (alot!) of clear packaging tape. 


I covered the entire barn with red paper.  It helps to have boat loads of scrapbook paper around.  I found this great paper for the inside of the barn, too, with wood structures, ladders, and stuff.   I had brown paper that looks like boards for the inside doors.  So far, so good!
 

I had to (buy more red paper) to cover the roof and I added the white trim for the doors.  Now it looks like a barn! 


Now comes the really fun part.  Adding all the little fliptops - starting with December 1 and ending on Christmas Day.  More scrapbook paper in prints and an assortment of number stickers.   I found little white envelopes at Michael's (25 for 2.99).  These envelopes and the red paper (5 at .49 and 5 free) were the only supplies I had to purchase for this project.  That's pretty good, I'd say. 
I know I don't really need to show you all the paper, but I am a paper freak, remember...love all the colors and designs, so I have to include it.  Deal.  Its part of my joy.   
I cut the red paper so one half would fit in the envelope, and the other half would hang out with the number on it.  So lovely, right!? 


Next came the task of taping all these envelopes on the barn.  The placement took alot of thought.  Using the sides of the barn and part of the roof helped get all 25 envelopes on.  I asked Jackson's mom, Tasha, to help me with the 'count down' activities for the inside of each card. She came up with a great list - some for Jackson to do on his own and some that includes their whole family:
#1 -read the story of Jesus' birth in the Bible;
#16 -share one of your tractors with a friend at the Christmas party;
#20 -eat peppermint ice cream. 
Love it! Good job, Tasha!   I could've said, "it is finished", but not me.  No, this was only the completion of Phase One.  

I had this idea that when Jackson pulls out the number and reads what is inside that he could flip the card over; this way he would know which cards were already used.  So, I found these awesome farm animal printables from Animaljr.com.  Exactly the right size and all colorful and pretty.  I printed two of each, that takes care of 18 envelopes.   


I randomly attached these darling little animals to the back of the red cards.  So, on December 25 all the numbers will be hidden and the animals will be showing.  The numbers above the doors have J E S U S on them.  And the two envelopes above these have a star and heart on them.  Just to keep Jackson wondering, "what's behind this number?"

   Phase two completed!! 

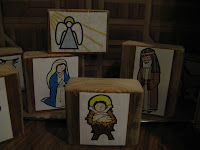
I wanted an interactive play element to this Barn Advent Calendar.  The plan was to find printables of the nativity and mod podge them onto wooden blocks.  I had an old 2x4 in my garage that my sister, Sandy, cut into the right sizes, and then I sanded the edges and cleaned them up a bit.
 
 
With these blocks, Jackson can tell the story of Jesus' birth.  I can only imagine how he will use them; stacking a king on top of the cow; putting the angel on top of the barn; parking his combine in the barn with the shepherds.  But, that's the point. 
 I hope he gives baby Jesus a ride on his favorite tractor!


Now, I can say, 'it is finished."  It was a joy to make.  It came together in phases.  That's how inspiration works for me.  The end is never very clear in the beginning.  I work with an idea in the present moment and see where it leads.  I hope Jackson will have a good deal of fun with this Barn Advent Calendar.  And that he'll know that our Saviour had a special affinity to barns, too.  After all, in His humble beginnings, Jesus was born in one.  

Happy Advent, Jackson!


Sunday, November 27, 2011

Matching ottomans

This Thanksgiving week provided some needed rest and relaxation!  I hope your holiday was enjoyable too!

I've been busy these last two weeks.  I had to take care of the yard, gardens, and deck before the snow flies.  And I want to park my Subaru (Dory) in the garage again, so I had to move all my finds from this summer and fall somewhere else.  They ended up in my laundry room/storage room.  Yeah, now that's quite a sight.  I'm trying to convert it to my winter workroom.  We'll see how that goes.

I want to show you the wooden ottoman that I've been working on.  I have three matching ottomans that I bought at a garage sale way back in May.  I liked that they had wheels and they would provide storage!     
 

This cream colored material was a great neutral, but too stained to use.  So, I took them all apart.   The foam padding was in good shape so I could reuse it.  Hmmm, what to do with these?  A toy box on wheels...I could see the fun Jackson (my 3-year old Godson) would have rolling it around his room to pick up all his John Deere tractors.   


But, I ended up painting this first one black.  I found some nice black material at Goodwill for cheap and thought it would make a nice cover.  It's kind of formal, but I liked it.   I cut out the pieces I needed and began to sew it together.
   

It's turned out pretty nice.  I thought it was a bit dark, so I bought an 8' piece of finishing pine that I cut up and nailed to the corners.  I added a strip of wood to the bottom too.  It brightened it up some, but I'm still not completely happy with it.  But, for now, it's very functional and a nice improvement.

I used a different printed fabric for the second ottoman and I painted this one brown.  I like this color combination better.  It's more cheerful!  


The hardest part of this project was getting the foam pad into the newly sewn cover.  I had to leave an opening in the cover so we could shove the foam in.  It took two of us...my sister, Sandy, was very helpful with this project.  I have the edges pinned so I could hand sew the opening shut. (I kinda like hand sewing.)
  

I like the way this second ottoman turned out.  I would make a matching one, but I don't have enough of this material for another cover.  Too bad, so sad!

 I haven't started the third ottoman, yet.  It might end up as a toy box...I'll have to wait and see what inspires me. 

Tuesday, November 15, 2011

Butterfly taggie

I feel the same about fabric as I do about scrapbook paper.  I love the colors and prints.  Mixing it all up, moving things around, creating a pattern and finally going for it.  There's just something about it that is so satisfying! 


Good friends of ours had their baby daughter baptised recently and I wanted to make her something.  I rummaged through my fabric, looking for fun, bright, colorful pieces of cloth to make a taggie blanket.  Something small, soft and colorful.  Adelyn's room is decorated with butterflies, so I decided on that shape instead of the more traditional square.  I found a really great tutorial on how to make a taggie blanket at Chica and Jo; detailed instructions and good pictures.  Any beginner can make this. 

I played with the fabric and decided on this pattern, cause I liked these prints so much and wanted to use all of them.  I sewed the strips together and then cut around the template I made out of craft paper.  The fabric back of this taggie is flannel in a cream color.  I used a pillowcase.


Then I chose the ribbon.  All colors and sizes.  I decided that the solid colors worked better with the printed fabric, but I also liked the polka dot ribbon.  So, I used them inside out, figuring Adelyn might like the peek-a-boo effect.  I used alot of tags.  I hope she likes them.


It was a fun gift to make.  I'll be making more of these in the future.

Sarah's quilt

I'm lucky to have learned how to sew as a young girl.  I took to it right away.  I remember sewing a dress for my mom and she actually wore it several times.  That was a proud moment!  So, I've been tinkering with quilting for awhile now and have finished some fun projects.  My most recent was a graduation quilt for my daughter, Sarah.  She waited 3 years for it, but loves it.  She titled it: sunset by the ocean.  

Sunday, November 13, 2011

'Vote for' pins

You know how one collects these 'vote for' pins.  They come in all sizes with all sorts of messages.   Well, I had a few, so I spent an afternoon remaking them into pretty magnets.   


I used my Creative Memories Circle cutting system for the different sizes.  It sure beats cutting circles by hand.  I love scrapbook paper.  All the colors and prints makes me smile.  I'm happy when I scrapbook.  I pulled out my smaller pieces for this project. 


 Now comes the messiest part.  Mod podge the pins, cover with paper, mod podge the paper.  Let dry.  Easy but messy.  Love this stuff!  
Here's the finished product.  A good afternoon, I'd say. 

Saturday, November 12, 2011

Square Clock

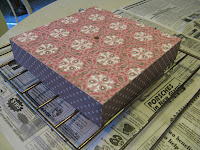
I bought this clock at a garage sale for $1.  I wanted to update the look and give it to my daughter, Sarah, for her apartment. 


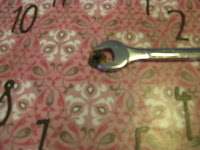
 I took it all apart and layed out the pieces so I would remember how to put it back together the right way.  I marked the spot on the paper that would need to be cut out for the center. 


I decopodged the paper on the front and sides and let it dry.  I used my Cricut to cut out the numbers, then glued them on and gave it a final coat of mod podge. 


I reassembled the clock, put in a battery and IT WORKS!  My daughter has it in her apartment.
CUTE!


Ribbon Holder


I found this beautifully made plate holder for $5 at a garage sale.  I wanted to remake it into a ribbon holder.  My ribbon drawer was out of control!


Some of the holders worked nicely, but not all.  So, I drilled some holes in the wood and inserted dowels. 
 
Here's the finished product hanging in my craft room.  I love it!  I want to add a basket at the bottom for scissors and left over ribbon. 

There was even a bonus in this project...I found my glue gun at the bottom of my ribbon drawer!